Boat bottom paint is also known as antifouling paint and is specifically designed to prevent all of the seaweed, barnacles and other aquatic organisms from latching onto, and sometimes eating, your boat. The critical ingredient is biocide, a poisonous substance that kills the plants and organisms that try to latch onto the hull of your boat. The most common biocide is copper, but there are others available. The higher the concentration of biocide in the paint, the more expensive the paint will be.
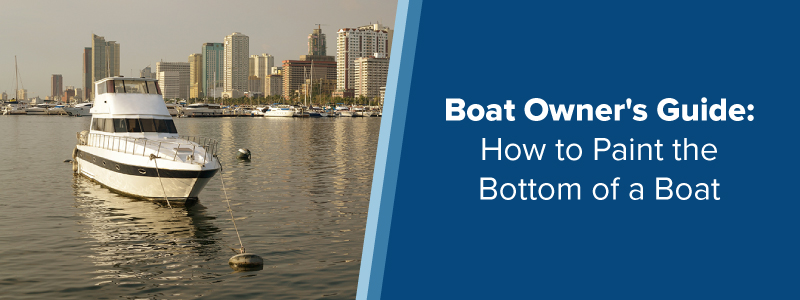
Should I Paint the Bottom of My Boat?
Not all boats need bottom paint. If you have a boat that is only in the water for short amounts of time or stored out of the water, a solid coat of wax along the hull and a routine thorough cleaning will do the trick.
If you have a trailer-sized boat, there are two important things to remember
- If you’re frequently moving your boat into and out of the water, you’ll wear the paint faster.
- If you have a trailer-sized boat, bottom paint might hurt your resale value, as potential buyers may see it as high maintenance.
If, on the other hand, your boat is in the water all year long, or for the majority of boating season, you should be using boat bottom paint. It’s important to note that once you bottom paint your boat, you will have to continue painting and cleaning on a regular basis to ensure it stays in its best shape.

How to Paint the Bottom of a Boat
Everyone’s process looks a little different for painting the bottom of a boat because there are several factors to consider. The biggest factor to take into consideration is whether or not you already have paint on the bottom of your boat. We’ve gathered an all-inclusive list of steps below, but keep in mind that if one doesn’t apply to you, you can move on to the next step.
- Clean the bottom of the boat.
- Pressure wash or scrub the hull.
- Scrape off hard growth that has accumulated on the hull.
- Use a dewaxing solvent if your boat hasn’t been painted before.
You want to start with a clean slate — regardless of whether or not this will be your boat’s first coat of bottom paint. It’s easiest to clean the hull of your boat when it’s wet, so if you can do it shortly after you take it out of the water, that’s ideal.
If the boatyard you use is like the majority, your boat will get a pressure wash shortly after they haul the boat — it may even get scraped to remove the hard growth. If it doesn’t, those are two things you’ll want to do. The goal is to get your boat as clean as possible and to remove all of the hard growth. You might even be able to remove some pre-existing paint with a pressure washer.
If you’re painting the bottom of your boat for the first time, you’ll need to take an additional step and use a dewaxing solvent. Fiberglass will have a mold release wax along the bottom that you need to remove. Thoroughly cleaning the hull with a dewaxing solvent is the first step.
- Determine if you need to strip the old paint.
- If the existing paint is chipping and/or flaking, you’ll need to strip it.
- If you cannot confirm the type of old paint that is on the boat, you will need to remove it.
If you’re figuring out how to repaint the bottom of a boat, you’ll need to examine the old paint to see if you need to strip it. The rule of thumb is that the fresh coat of paint is only going to stick as well as the old, so if you have chipping paint that is flaking off, it’s a sure sign you’re going to need a fresh start.
Regardless of how well the old paint adheres, you’ll need to strip it if you’re planning on changing the type of paint — or if you don’t know what kind is on the boat. The reason is that different types of paint have different properties and don’t adhere firmly to one another.
- Sand the hull.
- Use a random orbit sander with 80- to 100-grit sandpaper.
- Sand away most of the old paint.
- If this is the first time your boat has been painted, don’t forget to use dewaxing solvent before sanding.

If the old paint isn’t flaking or peeling, it’s probably safe to assume it’s in good condition, which means instead of stripping all of the paint off, you can skip the stripping and sand it.
If you’re learning how to paint the bottom of a boat for the first time, you’ll still have some sanding to do. A fiberglass hull will have a layer of mold release wax on it, which will need to be removed for the paint to adhere to the boat. Don’t forget to use the dewaxing solvent first — mentioned in step one.
While sanding might not sound like a big deal, it’s important to make sure you’re using a sandpaper that’s tough enough to rough up the existing paint, but not so rough that it tears through the paint and into the boat itself.
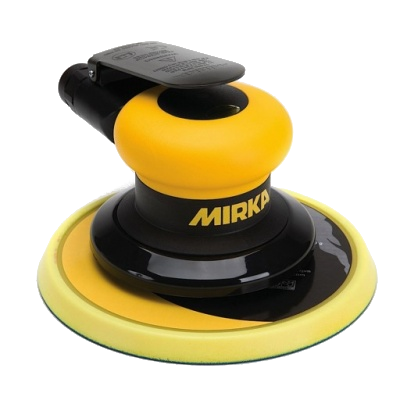
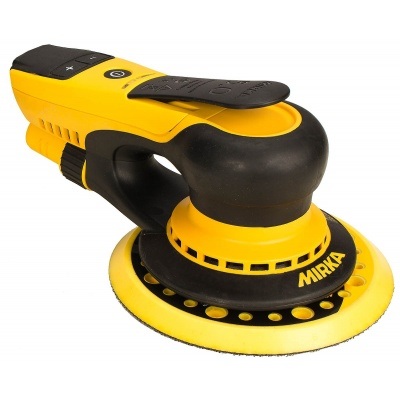
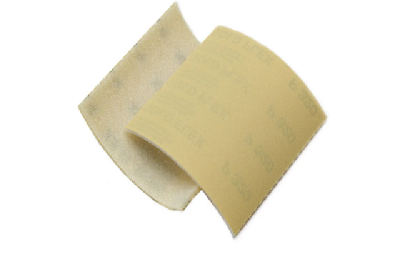
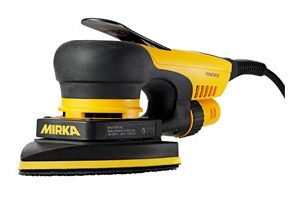
Stripping the old paint may not be necessary, but it’s still essential to sand away most of it. If you don’t, the paint will eventually crack and flake, forcing you to strip everything and start from scratch. Usually, 80- to 100-grit sandpaper is best for the job. You’ll also need a sanding materials, such as Mirka GoldFlex Soft Foam Pads, that work well on irregular surfaces and can get to hard-to-reach places.
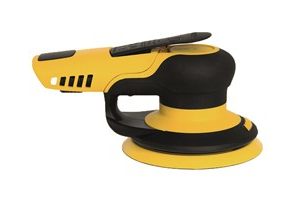
The tool you use is equally as crucial as the sandpaper. Unless you have experience with a grinder, stick to a random orbit sander or a finishing sander. Adding a vacuum with a hose connected to the sander will minimize the amount of dust you have to deal with in the process. Tools such as Mirka pneumatic random orbital finishing sanders make for a perfect choice, because they’re easy to use, and some models allow you to add vacuum hoses. You should never use belt sanders, as they’re made to be used on flat surfaces and could do significant damage to the bottom of your boat.
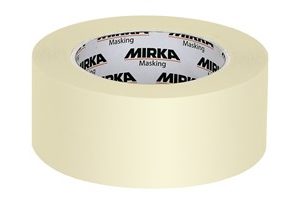
- Tape the waterline.
- Use long-mask tape to avoid removal issues.
- Start at a natural break point and work in 1.5-2-inch increments.
- Tape around all metal parts.
Choosing the right type of masking tape may not seem too important in the grand scheme of things, but if you select the wrong tape, you’ll spend a lot of time trying to get it off of your boat. Go for a “long-mask” tape, like 3M’s 2090 Scotch Blue Painter’s Tape, which is not only UV-stable but can also be left on for up to 60 days.
Start taping at a natural break point and work in 1.5-2-inch increments to get a smooth, even line.

Don’t forget to tape around all metal parts that could come in contact with the paint, as the copper biocide found in many paints will cause corrosion.
- Put on long sleeves and gloves.
- Avoid contact with the skin.
We’ve been focusing a lot on the protection of your boat, but this step is for your protection. The paint you choose will have some biocide in it and shouldn’t come in contact with your skin. Plan and make sure you have long sleeves and gloves ready so that you don’t risk the paint splattering on your hands or arms.
- Stir the paint.
- It’s essential that the pigment and biocide are thoroughly mixed before painting.
- A paint shaker or power mixing paddle is best.
Once you’ve taped the waterline on your hull, you’re ready to begin preparing for paint. It’s important to stir all paint, but especially bottom boat paint — you need to make sure both the pigment and the biocide gets evenly distributed. Hand mixing isn’t ideal — five minutes in a paint shaker is best, but a powered mixing paddle will also work.
If you don’t have access to a paint shaker or a powered mixing paddle, pour half of the paint into a bucket and stir it vigorously by hand. Make sure you get the copper off of the bottom. It could take a solid 15 minutes to get it thoroughly mixed, but it will be worth it — if it’s not evenly distributed, then areas of your boat won’t be protected.
Stirring the paint doesn’t stop with this step — it continues throughout the painting process until you finish painting your entire boat
- Roll the paint onto the hull.
- Stir frequently as you’re painting.
Since there is biocide in bottom paint, rolling the paint on is the preferred application. Unfortunately, you won’t be able to just gather up a few household-variety roller covers, brushes, tray liners and other accessories to help you — the solvents in the paint will dissolve them.
Boat Bottom Paint Types
While the boat bottom paint selection may seem endless, the reality is that all boat bottom boats can be divided into three broader categories that will have the most significant impact on your paint selection — ablative paints, hard paints and hybrid paints. There is no overall first, second and third place. Rather, the type of boat bottom paint you choose depends upon two things, the type of boat you have and the amount of effort you’re willing to put into protecting your boat bottom.

Ablative Paints
Ablative paints are self-polishing paints, which means that once they’re applied, the paint begins to gradually wear away as your boat moves through the water, revealing more biocide. This provides two significant benefits — you can be confident you continuously have fresh biocide working hard to prevent the growth of aquatic organisms and you won’t have to worry about the buildup of old paint.
Obviously, this self-polishing assumes that your boat will spend quite a bit of time in the water. If your boat isn’t frequently in motion, you won’t get the self-polishing effect, and ablative paint may not be your best choice. This type of boat bottom paint also isn’t your best choice if you tend to move at high speeds in your boat, as that motion will quickly remove the paint from the bottom of your boat.
Hard Bottom Paints 

If you own a fast boat, you’ll probably want to choose a hard bottom paint, which is also known as a non-sloughing or hard modified epoxy paint. Rather than the paint wearing away, with this option, the biocide wears away. That means over time water can penetrate more and more of the paint. Overall, you’ll get a tough, hard coating on the bottom of your boat that stands up to the toughest wear and tear. You can even polish it to maximize your boat speed.
The negative is that a hard coating is tough to remove when you want to put a fresh coat on. Painting over old layers is an option, but it won’t work forever, as a thick layer of hard paint will begin to crack and peel.
Hybrid Paints
If you aren’t sold on ablative or hard bottom paints, you may be a good candidate for hybrid paint, which is just that — a hybrid of these two types. Hybrid paint is also known as semi-hard ablative paint. It combines the pros of both, resulting in a hard surface that stands up to wear and tear — like a hard bottom paint — with the buildup resistance that comes with ablative paint.
Hybrid paints are an excellent choice for a variety of boats, but especially for vessels that may need a harder bottom, but doesn’t spend an extended period out of the water, as hard paints work best in the water.
Boat Bottom Paint Application Considerations
Once you’ve decided to paint the bottom of your boat, there are a few additional factors to consider in selecting a paint and starting to prepare.
Amount
Make sure you follow the manufacturers’ instructions for square footage when you’re trying to figure out how much bottom paint to purchase. This is not the time to skimp on paint. Applying any bottom paint too thinly will minimize the protection it provides. While some types of paint may call for heavier coats than others, you should never apply any kind in a thin layer.

Drying
Generally, boat bottom paints dry quickly. The amount of time differs depending on the specific type of paint you choose. It’s important to read the paint manufacturers’ information, so you’re aware of how much time you need to leave between coats and ultimately how much time it takes to dry.
In addition to guidance on drying time, the manufacturer usually provides a recommendation for time between paint application and putting your boat back in the water — something that could be devastating to realize if you planned to paint shortly before, or during, boating season.
Color
Finally, you want to consider color. While you may love the color of the paint you previously had on the boat, choosing a different color each time you paint makes it easier to see old versus new paint when you sand the next time.
National Abrasives, Inc.
If you’re planning to paint the bottom of your boat, National Abrasives, Inc., carries a variety of sandpapers that can help you get the job done. We offer fast shipping, excellent customer service and discounts on bulk orders. Choose from a variety of sandpapers, including waterproof sanding sheets for wet sanding, Abranet sanding sheets for your orbit sander, Gold Proflex sandpaper for touching up with hand sanding and more. Please browse our selection and feel free to contact us with any questions.
*Updated October 30, 2017