You’ve been thinking of that wood or metal-working project for a while and now you’ve finally decided to get to it. That’s great!
Let’s face it, though: For many of us, the most recent time we picked up a tool and started changing the shape of a piece of wood was high school woodshop. Even if you’ve been a do-it-yourselfer at home more recently than that, it’s not always obvious where to begin on your next project and which tool is the right one to use.
There are many tools available for wood or metal work and each has its specific role in a finished product. Here we’ll focus on sanders; in particular, orbital sanders. First, we’ll talk about the purpose of a sander, how an orbital sander works and then we’ll move to specific additional details.
- Types of Sanders
- How To Use An Orbital Sander
- Handling Dustr
- Safety While Handling An Orbital Sander
- Repairing an Orbital Sander
- Where To Buy Your Obital Sander
Types of Sanders
Any time you have rough spots, sawed edges or need a smooth finish, you’re going to be looking for a sander. Sanders smooth rough surfaces, and as surfaces come in all shapes and sizes, so do sanders.
Most woodworking sanders are electrical, but if you see someone in an auto body repair shop using a sander, it’s more likely to be driven by compressed air. Either way, they each perform the same basic tasks.
There are two essential types of sanders that we’ll highlight here: belt sanders and orbital sanders. Let’s first introduce belt sanders and then devote more time to talking about orbital sanders in greater detail.
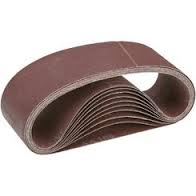
Belt Sanders
One of the most common sanders is the belt sander, which is essentially a machine that couples sand paper and a conveyer belt. The belt can be several inches or more in length and although it’s a versatile tool, as Popular Mechanics noted, “some woodworkers call the belt sander the most dangerous tool in the shop.” Here’s why.
A belt sander is a powerful tool. It’s meant for doing coarse sanding on a large scale, not the fine crafting that comes at the finish. The belt moves rapidly and if you apply it anywhere you don’t want you’ll likely regret it. It’s most useful for large, flat surfaces and smoothing cut edges. You’ll want to sand parallel to the wood grain to avoid scratching the surface.
Belt sanders do offer belts with different coarseness, but even a finer-grain belt moving at a very high speed should be used with forethought. Also, you can find belts with different sizes – typically 3 or 4 inches wide and 18 to 24 inches long.
When you have a belt sander and a rapidly moving 4-inch by 2-foot sanding belt, you have to consider what you’re sanding very carefully. You also need to pay attention to reducing the granularity of the sander as you progress, going from coarse to finer-grained sanding belts.
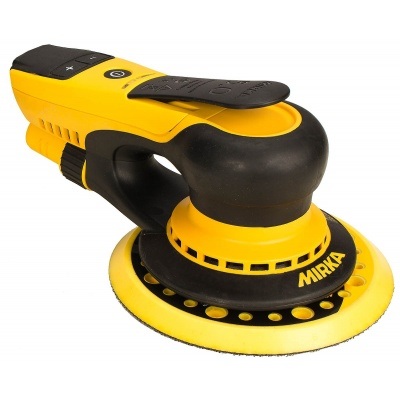
Orbital Sanders & How They Work

Orbital sanders come in two basic forms. There’s the standard orbital sander in which the sander has a square sanding pad and it moves in an orbital fashion. Then there’s the random orbital sander, in which the sander actually spins a circular sanding disk while moving it in an elliptical pattern.
What is a ROS Sander?
The random orbital sander is perhaps a bit more like a belt sander, in that it runs faster than a typical orbital sander and can be used to make big changes to a piece of wood or aggressively sand metal. It can also make a finer finish than you’ll get with a traditional orbital sander. It’s a very versatile tool.
The random orbital sander, or ROS, is perhaps a bit more like a belt sander, in that it runs faster than a typical orbital sander and can be used to make big changes to a piece of wood or aggressively sand metal. It can also make a finer finish than you’ll get with a traditional orbital sander. It’s a very versatile tool.
In contrast, a traditional orbital sander is much easier for beginners. It’s much more difficult to get yourself in trouble. You’ll be challenged if using this tool for big jobs, but at the same time you’ll not be likely to ruin a polished piece of wood, either. This is the tool you want to finish your job and give it a super-smooth feel.
Shop Mirka Electric Random Orbital Sander
How to Use an Orbital Sander
Before you get started and feel comfortable with how to use a sander, you need to ensure your own safety.
Basic Sander Safety
- Make certain you have a clear workspace, with plenty of room and no fire hazards
- Always wear eye protection. This is particularly


true when working with machinery that rotates very quickly. It’s just too easy for some small splinter to get picked up by the tool and fly quickly into your eye.
With basic safety handled, now it’s time to handle your sander. Orbital sanders are lightweight and easy to maneuver. You can control the sander with one hand, leaving the other free to adjust the piece you are working on. We’ll have more to say about that in just a moment.
Sandpaper generally comes in a sheet measuring 9 inches by 11 inches. A traditional orbital sander relies on one quarter of this sheet. You can replace the paper with different alternatives that offer finer or coarser sanding.
Recommended Sanders for Deck Sanding
Electric Orbital Sanders
- Mirka 3-Inch DEOS 353CV Sander
- Mirka 3-Inch DEOS 383CV Sander
- Mirka 5-Inch DEROS 550X CV Sander
- Mirka 6-Inch DEROS 625X CV Sander
- Mirka 6-Inch DEROS 650X CV Sander
Pnuematic Orbital Sanders
- Mirka 3-Inch MR-350 Finishing Sander
- Mirka 3-Inch MR-3SGV Finishing Sander
- Mirka 5-Inch MR-5 Finishing Sander
- Mirka 5-Inch MR-525 Finishing Sander
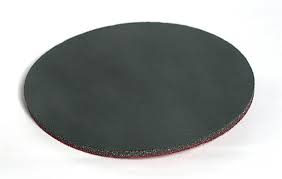
Selecting The Right Sandpaper
Sandpaper is described with a numbering system that runs typically from 60 to 240. The coarse end of that scale is 60. You want to use that when you’re just starting the project in order to make the most progress in the shortest period of time. The finer end is at 240. You’ll want to use that when you are putting on finishing touches.
You can control the force of the sander by applying more or less pressure to it while you’re sanding, but you really should ensure that you choose the right coarseness for the job. The sandpaper should be doing the work, not your arm. You shouldn’t need to feel like you are pressing hard on the sander in order to get the work done.
How To Get The Best Sanding Results With An Orbital Sander
It’s also important that you operate the sander with the plane of the sandpaper – or in the case of a random orbital sander, the sanding disk – flush to the material you are working on. You want to maximize the sanding effect by having the largest area of contact between the material and the sander.
Handling Dust
As you’re working at turning wood into sawdust, that sawdust has to go somewhere. The same principle applies to working with metal, and this brings up two concerns.
First, think ahead and have a convenient way to clean up the dust or filings that you’re going to create. Lay down sheets under your project and be ready to move them or vacuum up the mess.
Some sanders come with a vacuum bag attached, which is a nice feature. It’s more common on random orbital sanders because standard orbital sanders are going to generate less debris.
Second, if you don’t don a sanding mask, you’re going to be breathing in the dust you create as you work. There are several options for sanding masks, including half-face models that use snap-on filters and particulate-disposable respirators that you use and then discard.
Keeping Your Project Under Control
Even though you can operate an orbital sander with one hand, it’s not always feasible to keep your project under control with your other hand. In that case, you’ll want to use a bench vise or other form of clamps to hold your work while you sand away.
Be sure that you clamp your project firmly but don’t damage it with the clamps. It’s easy with some clamps to leave unwanted marks; then you’re back to sanding away the unwanted marks.
Another way to keep your project in place is to rest it on a piece of carpet lining. The carpet lining has sufficient friction to hold a piece of wood in place and won’t scratch the backside while you work on it.
Repairing an Orbital Sander
If something happens to your sander and you need to fix it, you can consider opening it yourself and determining if you can get it working again. Before you do that, make sure that the sander is not plugged in to a socket.
Most often, you can get inside the sander by removing a set of screws and lifting the top cover off of the sander. This will reveal the motor, wiring, cord protector and other elements of the sander. You may be able to disassemble the device completely by finding all the screw points and opening the casing.
That said, if you have never repaired a motor-driven tool before, you’re probably going to discover that repairing a sander isn’t something for the first-time do-it-yourselfer. You should seek out a qualified repair shop and see if it will let you look over their worker’s shoulder to learn more about how the device works and what you can do next time.
Purchasing Your Sander
You have many options for acquiring your sander, but you’ll do yourself a favor by seeking out a reputable company with years of service and excellent customer care. For example, National Abrasives Inc. is a family owned company with fast shipping and discounted pricing for bulk orders.
You also want to see if a company will offer free samples for you to examine. Don’t forget to check out the variety of tools that are offered. You want to ensure that a company has all the options that may be right for your job, as well as the tools you may need for your next one.
Your equipment provider should carry brand-name sanders, such as Mirka, along with the discs, rolls, sheets, pads, belts and other items that your tool may need.
The Mirka CEROS (which stands for compact electric random orbital sander) is a great choice. You can easily adjust the orbital speed from 4,000 to 10,000 rpm in 1,000 rpm increments. This adjustment can be done while the tool is in use. It also supports a vacuum hose to remove dust from your project.
Summary
Using an orbital sander, or any other shop tool, to help perfect your wood or metal-working project can be a very rewarding experience. There’s nothing that substitutes for the feeling of crafting something with your own hands.
Before you get going with any shop tool, you should always ensure that you’re comfortable with the following items:
![]()
With sanders, you need to consider the size and scope of the project. Do you have to sand a large and rough surface area, or is it more about putting a smooth finish on an already-worked project? Perhaps it is something in between? Whatever your answer, there’s a sanding tool that’s right for your situation.
You may need a belt sander at first, but as discussed, this is a powerful tool that needs to be respected. All power tools deserve respect, but belt sanders can easily ruin a project if used too eagerly.
Instead, as highlighted here, you can focus on orbital sanders, including random orbital sanders, which are much easier to handle, lightweight and can be operated with a single hand. Many of these sanders, such as the Mirka CEROS, are versatile and reliable tools that can be adapted with the right sanding sheet or disc to provide exactly the level of sanding that you want.
Finally, unless you’re an experienced craftsman, always be sure you buy your tools from a reputable dealer. Look for testimonials and great customer service. You’ll have questions, and you’ll want friendly and informative answers.
National Abrasives Inc. is a good source to help you get started. It offers the Mirka CEROS along with various other tools and accessories. It also offers discounts for bulk orders, free shipping and other free extras. Contact our team today to order the sander you need for your application.
*Updated: September 18, 2017