It’s tremendously satisfying for project workers to lift their sander, shut it off and then stand back to admire their finished work that’s ready for coating. Whether your material is wood, metal or some other medium, the care you take in finish sanding makes all the difference to how your finished product appears. Each person has their tricks and sanding techniques, but a common denominator with successful craftspeople is they know how to use a finishing sander.
If you’re one of these crafty people who take pride in your finished projects, you’ll likely know what a finishing sander is used for. But you may not know the differences between the various types of finishing sanders and how a finishing sander works exactly. You’ve likely heard the terms belt, disk, in-line and orbital but do you know what these terms mean when it comes to properly sanding a surface to silky-smooth perfection?
Every sander also has something in common. They’re designed to use abrasives for removing unnecessary material from surfaces. However, sanders are designed in various sizes with different features to achieve the same thing. Part of your learning curve as your craft skills evolve is knowing how to use a finishing sander so you can ultimately end with a perfectly sanded surface.
It’s more than just knowing when to use an orbital sander vs. a finishing sander. Understanding how you can use each model of sander in different applications is the real prize. It’s about safely operating these power tools, selecting the right abrasives to suit the material and then being able to move from rough sanding through to your final finish. It’s also about caring for your tools and learning how to extend the lifetime of a finishing sander.

The Different Types of Finishing Sanders
The first thing to consider when sourcing a finishing sander is its power supply. Sanders are available in two power sources. They are pneumatic, or air-driven sanders, and electric sanders. You’ll usually find air sanders around metal work like in auto-body repair places where they have already invested in expensive air compressors and attachments like hoses. Home hobbyists and even professional woodworkers generally prefer electric sanders.
Electric sanders are widely available and are safe tools when used by knowledgeable people. You’ll find that all electric sanders on the market today come with safety devices and are certified by government agencies to avoid the chance of electric shock. But you still need to be cautious when operating the more aggressive sanders like belt models as opposed to gentler in-line and orbital finishing sanders.
Let’s have a brief review of the different sander types before moving on to how to properly use one. You have these choices when purchasing sanders:
- Belt sanders are usually not considered final finishing sanders. With the right grit of sandpaper and carefully operated they can produce excellent results. Think of belt sanders as having a continuous loop of sandpaper that works like a conveyor belt. It revolves in a straight line and is designed to remove rough material from large, flat surfaces. But in the right hands and with fine sandpaper grits, belt sanders can leave a polished piece ready for staining. Belt sanders also work well on outside corners.
- Disk sanders are also not the best for finishing work, especially on wood. They’re more often used in metal work and operate with a spinning abrasive circular disk that grinds away material. Many disk sanders are designed with offset heads at a right angle to the tool’s motor. That’s why they’ve earned the name “angle grinders.”
- In-line sanders are the most basic of finishing sanders. They’ve been around for decades. These power tools employ a square or rectangular sheet of sandpaper mounted on a rubber pad or foot. The pad moves back and forth on an in-line motion and scrubs the surface much like you’d do by hand. In-line sanders are ideal for working with the grain but aren’t effective when you try cross-grain sanding.
- Orbital sanders operate in a vibrating, circular pattern, but the sanding head or surface doesn’t actually spin. Most orbital sanders also use rectangular or square sandpaper and are excellent at the semi-rough to final finish stages. Many orbital sanders are lightweight and meant to be operated with one hand leaving the other hand free to hold the work. However, there’s a drawback with orbital sanders. Because the sandpaper wiggles in a predictable motion on the sanded surface, it tends to leave swirl marks that spread across the grain. These can be hard to remove.
- Random orbital sanders are the solution to swirl marks. They’re the most versatile finishing sander on the market. If you have only one sander in your shop, you’re best to make it a random orbital sander. These great power tools have a round or circular sanding disk. The disk is removable to let you change grits as you continue to sand. It works by having the motor’s driveshaft connected to a counterweight. A random sanding pattern happens from a combination of the spinning shaft and the weight’s momentum. There’s never the same sanding motion, so there’s very few, or no swirl marks seen.
Choosing the Right Type of Sandpaper
Before discussing the proper and most effective techniques for operating a finishing sander, it’s important that you select the right type of sandpaper for the job.

Using the appropriate sandpaper for each sanding stage and for the particular material you’re working on makes or breaks the final result. Grit and composition are the two components that determine what sandpaper to select.
- Grit is the measurement of sandpaper’s coarseness or smoothness. The term refers to how many abrasive or cutting particles adhere to the sandpaper surface per square inch. Grit is numerically rated in numbers from a low of 60 to a high of 240. Coarse 60-grit sandpaper has 60 cutting teeth per square inch and can rip off material in a hurry. Fine or ultra-fine 240-grit sand has 240 cutters per square inch and leaves a glossy finish that’s perfect to the eye. These are extreme grits. Most woodworking projects, for example, start with a 100-grit sandpaper and then progressively work up to a finish of 180 or 220-grit.
- Composition is how your sandpaper is designed and from what materials it’s made. There’s a wide variety of sandpaper composition on the market. There are dozens of paper backings and cutting agents available. If you’re unfamiliar with what you need, it’s best to contact an abrasive supplier who knows their stuff. Sandpaper can be designed to work dry, or it can also be used wet. People generally use dry sandpaper on wood but use wet sandpaper for metalwork. Wet additives like water or oil act as a lubricant and significantly help get a gloss finish.
It’s critical to buy quality sandpaper to produce professional results. Sandpaper is like almost all commodities. You get what you pay for. And it pays to buy more expensive sandpaper and source it through a specialty abrasives supplier. Good sandpaper may cost you more upfront, but it’ll last far longer and produce better results.
Different Finishing Sandpaper Sizes
It’s not only important to select the right finishing sander and sandpaper for your project, but choosing the right sander and sandpaper size is also critical. It depends on the type of material you’re working with and the overall area that needs sanding. Big jobs require a larger sandpaper surface while small projects with delicate details benefit from compact and low-speed finishing sanders.
There are three main styles of abrasive sandpaper available. One is the continuous loop or belt. The second is square or rectangular sheets. The third is circular pads or disks. They’re all available in these various sizes depending on the type of finishing sander you’re using.
- Belt sandpaper is measured by its width and circumference or loop length. Small belt sanders have 3-inch wide paper and 18-inch loops. Medium belts are 3×21, large belts are 3×24 and extra-large belt sanders have 4×24-inch sanding surfaces. It might not sound like much variation in size. But when you measure the total difference in sanding area, large belts cover far more space than small ones. They’re also much harder to operate. That’s due to the friction force caused by big surfaces.
- Square or rectangular sandpaper is used for inline and orbital sanders. The most common sheet size is nine by 11 inches. Few power sanders are large enough to accommodate an entire sheet, so sandpaper is often divided into sections. The most popular size for in-line and orbital sanding is 1/4 sheet but some large sanders take one-half. Some small finishing sanders only need a tiny fraction like a sixth or an eighth.
- Round or circular sandpaper is used on random orbital sanders. There are two popular sizes. Five-inch diameter disks are the most popular. They’re large enough for most projects while still compact enough to use with one hand. The next size up is the 6-inch diameter disks. A 1-inch increment doesn’t appear like a significant improvement, but these bigger disks actually have 45% more abrasive area.
Recommended Finishing Sanders
Electric Orbital Sanders
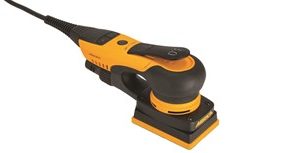
- Mirka 3-Inch DEOS 353CV Sander
- Mirka 3-Inch DEOS 383CV Sander
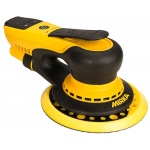
- Mirka 5-Inch DEROS 550X CV Sander
- Mirka 6-Inch DEROS 625X CV Sander
- Mirka 6-Inch DEROS 650X CV Sander
Pnuematic Orbital Sanders
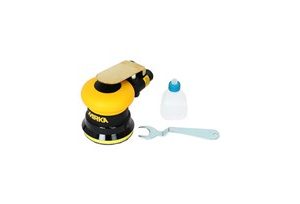
- Mirka 3-Inch MR-350 Finishing Sander
- Mirka 3-Inch MR-3SGV Finishing Sander
- Mirka 5-Inch MR-5 Finishing Sander
- Mirka 5-Inch MR-525 Finishing Sander
Finishing Sander Speeds
Sanding speed has an enormous influence on how effective your finishing sander is at material removal. Speed also has a big impact on the amount of time your sanding takes. It goes without saying that the faster your sanding speed, the quicker your job will get done. Time might be of the essence in some cases but speed can also work to your disadvantage. It’s all about control.
Finishing sanders are available with speed control. Some basic sanders only have one control—on or off. But these sanders vary in how fast they operate. Speed is measured in strokes per minute with in-line and orbital sanders. Or, it’s measured in revolutions per minute with belt, disk and random orbital sanders.
More advanced and expensive finishing sanders have adjustable speeds and controls. In-line and orbital sanders may have two or three speeds that range from slow to fast strokes per minute. Belt sanders also have varying speeds but are limited in their revolutions due to their size. If it’s too fast, it will cause belt destruction and create a dangerous situation.
Random orbital finishing sanders offer the highest speeds and control rates. Some random orbital sanders have speeds between 3,000 and 4,500 revolutions per minute. Top-end random orbital sanders can produce up to 10,000 orbits per minute. That’s a lot of sanding time.

The Finish Sanding Process
Sanding your finished work is a step-by-step process. It starts with using relatively coarse sandpaper grits. This is dictated by the material you’re working on. Rough lumber will need a low grit like 60 or 80 to start. You want to get the bulk of uneven surface out of the way quickly and with minimal effort. Smoother surfaces like already planed boards might need a few passes with 100-grit and then you’ll change to a higher, finer cutting surface like 150-grit.
There is no set number of sandpaper changes to make. It depends on your original surface and what result you’re looking for. There’s also no set amount of time you need to spend with one particular grit before moving on to another. Two factors greatly affect your finish sanding with wood projects.
- Grain is the pattern created by a tree’s heartwood and sapwood. Heartwood is harder than sapwood and resists sanding compared to the soft grains. A rule of thumb is always sand parallel to the length of the grain, not across it. Cross-graining will leave irregular ridges and a wavy surface. The exception is when using a random orbital sander.
- Porosity is wood’s density. Hardwoods like oak and maple are closed cell structures that are tougher to sand than open cell woods such as pine and cedar. Hardwoods require more time and more grit changes to get a final smooth finish than softwoods.

Sanding metal is also a step-by-step process. You start with coarse and end with fine grits, again depending on the final finish you want. Metal also has different sanding resistance. Steel is much harder than aluminum and needs more sanding effort.
Something that’s important to know in the sanding process is when to stop. There’s a point when you can only get your work so smooth with a particular grit. This is a judgment call and it also comes with experience. Excessive sanding during one of your progressive steps not just wastes time, it can also waste material from over-sanding.
One important tip for knowing how to use a finishing sander is to activate your sander and bring it up to full speed before applying it to your work. If you place your finishing sander on the piece and then start it, you risk sending the object flying as it attempts to resist motion. That’s dangerous and easy to avoid.
Sourcing Your Finishing Sanders and Abrasive Products
It’s as important to know where best to source your finishing sanders and abrasive products as it is in knowing how to use them. National Abrasives Inc. is your trusted source. For over 19 years, we’ve supplied top quality finishing sanders and sandpaper to craftspeople across America.
We’re a family-owned business that’s built a great reputation by serving customers and supplying them with the best performing sanding equipment at the best available prices. Shop our wide inventory of excellent finishing sanders and abrasive products.